Nginx 简介及配置 (24-05-15)
简介
Nginx 是一个高性能的 HTTP 和 reverse proxy 服务器,同时也支持邮件代理。由俄罗斯程序员 Igor Sysoev 创建,目的为了解决 C10k 问题,即并发问题。在 2004 年 8 月 1 日首次发布。2019 年 3 月,Nginx 已经被 F5 公司收购。
Nginx 是一个轻量级的 Web 服务器,并且支持反向代理,负载均衡,HTTP 缓存,图片转换,静态内容加速等。在服务器市场占有率迄今为止是最高的。
安装
- Linux
1sudo apt update
2sudo apt install nginx
- Mac OS
1brew install nginx
- Windows
scoop install nginx
choco install nginx- docker
1docker pull nginx
启动
- Linux,Mac OS
1nginx
-
Windows 双击 nginx.exe
-
docker
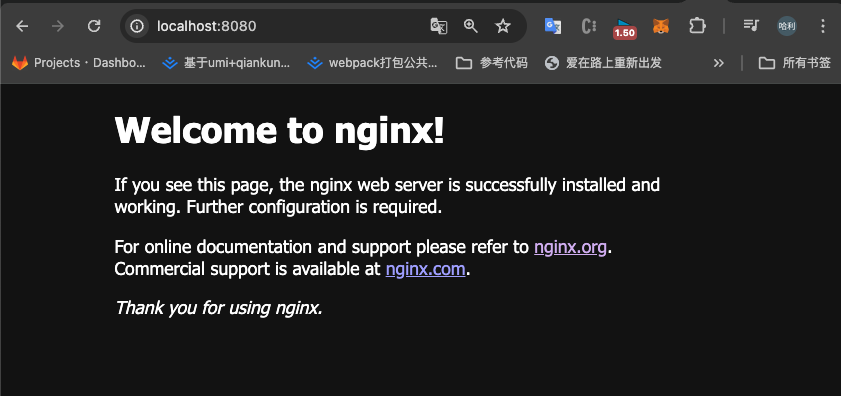
1docker run -d -p 8080:8080 nginx
浏览器打开:localhost:8080
验证是否启动成功:
1ps -ef | grep nginx
第二栏就是 nginx 进程的 PID 53807 (Master) 和 53808 (Worker)

Nginx 的工作模式是主进程 Master - Worker 模式,主进程主要复制读取和验证配置文件,而 Worker 子进程负责处理请求。
查看 8080 端口占用情况:
1lsof -i:8080

常用命令
- 停止,重载及重新打开日志
1nginx -s <signal>
上面的***<signal>***可以是:
- stop:停止 Nginx
- quit:退出 Nginx
- reload:重载 Nginx 配置文件
- reopen:重新打开 Nginx 日志文件
- 查看 Nginx 各种配置参数
查看所有参数:nginx -V,再看 --conf-path 参数的值
1(base) zyzy:~ $ nginx -V
2nginx version: nginx/1.25.5
3built by clang 15.0.0 (clang-1500.3.9.4)
4built with OpenSSL 3.2.1 30 Jan 2024 (running with OpenSSL 3.3.0 9 Apr 2024)
5TLS SNI support enabled
6configure arguments: --prefix=/opt/homebrew/Cellar/nginx/1.25.5 --sbin-path=/opt/homebrew/Cellar/nginx/1.25.5/bin/nginx --with-cc-opt='-I/opt/homebrew/opt/pcre2/include -I/opt/homebrew/opt/openssl@3/include' --with-ld-opt='-L/opt/homebrew/opt/pcre2/lib -L/opt/homebrew/opt/openssl@3/lib' --conf-path=/opt/homebrew/etc/nginx/nginx.conf --pid-path=/opt/homebrew/var/run/nginx.pid --lock-path=/opt/homebrew/var/run/nginx.lock --http-client-body-temp-path=/opt/homebrew/var/run/nginx/client_body_temp --http-proxy-temp-path=/opt/homebrew/var/run/nginx/proxy_temp --http-fastcgi-temp-path=/opt/homebrew/var/run/nginx/fastcgi_temp --http-uwsgi-temp-path=/opt/homebrew/var/run/nginx/uwsgi_temp --http-scgi-temp-path=/opt/homebrew/var/run/nginx/scgi_temp --http-log-path=/opt/homebrew/var/log/nginx/access.log --error-log-path=/opt/homebrew/var/log/nginx/error.log --with-compat --with-debug --with-http_addition_module --with-http_auth_request_module --with-http_dav_module --with-http_degradation_module --with-http_flv_module --with-http_gunzip_module --with-http_gzip_static_module --with-http_mp4_module --with-http_random_index_module --with-http_realip_module --with-http_secure_link_module --with-http_slice_module --with-http_ssl_module --with-http_stub_status_module --with-http_sub_module --with-http_v2_module --with-http_v3_module --with-ipv6 --with-mail --with-mail_ssl_module --with-pcre --with-pcre-jit --with-stream --with-stream_realip_module --with-stream_ssl_module --with-stream_ssl_preread_module
也可以用 nginx -t查看
1(base) zyzy:~ $ nginx -t
2nginx: the configuration file /opt/homebrew/etc/nginx/nginx.conf syntax is ok
3nginx: configuration file /opt/homebrew/etc/nginx/nginx.conf test is successful
一般来说,Mac 系统该配置文件在 /opt/homebrew/etc/nginx/nginx.conf Linux 系统该配置文件在 /etc/nginx/conf 或 /usr/local/etc/nginx
配置
这个是 Nginx 的默认配置文件:默认很多操作没有解开:
1
2#user  nobody;
3worker_processes  1;
4
5#error_log  logs/error.log;
6#error_log  logs/error.log  notice;
7#error_log  logs/error.log  info;
8
9#pid        logs/nginx.pid;
10
11
12events {
13    worker_connections  1024;
14}
15
16
17http {
18    include       mime.types;
19    default_type  application/octet-stream;
20
21    #log_format  main  '$remote_addr - $remote_user [$time_local] "$request" '
22    #                  '$status $body_bytes_sent "$http_referer" '
23    #                  '"$http_user_agent" "$http_x_forwarded_for"';
24
25    #access_log  logs/access.log  main;
26
27    sendfile        on;
28    #tcp_nopush     on;
29
30    #keepalive_timeout  0;
31    keepalive_timeout  65;
32
33    #gzip  on;
34
35    server {
36        listen       8080;
37        server_name  localhost;
38
39        #charset koi8-r;
40
41        #access_log  logs/host.access.log  main;
42
43        location / {
44            root   html;
45            index  index.html index.htm;
46        }
47
48        #error_page  404              /404.html;
49
50        # redirect server error pages to the static page /50x.html
51        #
52        error_page   500 502 503 504  /50x.html;
53        location = /50x.html {
54            root   html;
55        }
56
57        # proxy the PHP scripts to Apache listening on 127.0.0.1:80
58        #
59        #location ~ \.php$ {
60        #    proxy_pass   http://127.0.0.1;
61        #}
62
63        # pass the PHP scripts to FastCGI server listening on 127.0.0.1:9000
64        #
65        #location ~ \.php$ {
66        #    root           html;
67        #    fastcgi_pass   127.0.0.1:9000;
68        #    fastcgi_index  index.php;
69        #    fastcgi_param  SCRIPT_FILENAME  /scripts$fastcgi_script_name;
70        #    include        fastcgi_params;
71        #}
72
73        # deny access to .htaccess files, if Apache's document root
74        # concurs with nginx's one
75        #
76        #location ~ /\.ht {
77        #    deny  all;
78        #}
79    }
80
81
82    # another virtual host using mix of IP-, name-, and port-based configuration
83    #
84    #server {
85    #    listen       8000;
86    #    listen       somename:8080;
87    #    server_name  somename  alias  another.alias;
88
89    #    location / {
90    #        root   html;
91    #        index  index.html index.htm;
92    #    }
93    #}
94
95
96    # HTTPS server
97    #
98    #server {
99    #    listen       443 ssl;
100    #    server_name  localhost;
101
102    #    ssl_certificate      cert.pem;
103    #    ssl_certificate_key  cert.key;
104
105    #    ssl_session_cache    shared:SSL:1m;
106    #    ssl_session_timeout  5m;
107
108    #    ssl_ciphers  HIGH:!aNULL:!MD5;
109    #    ssl_prefer_server_ciphers  on;
110
111    #    location / {
112    #        root   html;
113    #        index  index.html index.htm;
114    #    }
115    #}
116    include servers/*;
117}
118
别看这么多,其实就 3 部分内容
- 全局块:例如worker_processes配置 Nginx 的进程数,默认为 1;
- events:事件部分,配置 Nginx 的事件处理方式,如 worker_processes、worker_connections 等
- http:HTTP 模块部分,配置 Nginx 的 HTTP 模块,如 server、location 等
worker_processes
我们可以配置该参数为 auto,这样就能自动匹配电脑应有的核心数。
这里我故意把配置写错:worker_processes 10,尾部没加***;***,运行 nginx -t,能帮我们自带检查该文件错误:
1(base) zyzy:1.25.5 (master) $ nginx -t
2nginx: [emerg] directive "worker_processes" is not terminated by ";" in /opt/homebrew/etc/nginx/nginx.conf:12
3nginx: configuration file /opt/homebrew/etc/nginx/nginx.conf test failed
每次修改完成后,nginx -s reload 重新加载 nginx.conf 文件
改为 auto 后,跑 ps -ef | grep nginx,发现 nginx 进程数变为 8 个,代表我用的 mac 电脑有 8 核,如下图:
events
worker_connections:配置 Nginx 的最大连接数,默认为 1024 multi_accept:是否允许同时接受多个连接,默认为 off,表示只接受一个连接,如果为 on,则表示允许同时接受多个连接
http
这个是被修改得最多的模块
include mime.types:包含 Nginx 能处理文件类型,默认为路径为: /opt/homebrew/etc/nginx/mime.types
server
在 http 模块下,包含多个 server 模块,每个 server 模块代表一个虚拟主机。
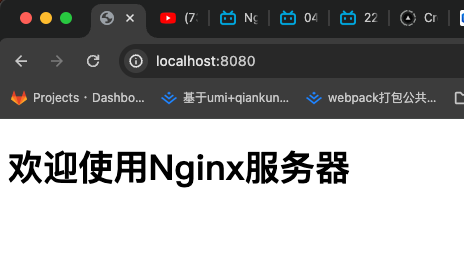
修改默认的 HTML 静态页面
部署一个静态站点,我们需要按以下配置修改对应的 html 文件:
1  location / {
2      root   html;
3      index  index.html index.htm;
4  }
location /:表示匹配所有请求,root:表示静态资源文件存放的目录,index:表示默认首页,默认为 index.html
那就去找这个 html 文件夹,可用 nginx -V 找到 --prefix=/opt/homebrew/Cellar/nginx/1.25.5字段,能找到 Nginx 的安装路径
1(base) zyzy:~ $ cd /opt/homebrew/Cellar/nginx/1.25.5
2(base) zyzy:1.25.5 (master) $ ll
3total 680
4-rw-r--r--  1 ziyouzhiyi  admin   319K  4 16 22:37 CHANGES
5-rw-r--r--  1 ziyouzhiyi  admin   1.3K  5 14 10:49 INSTALL_RECEIPT.json
6-rw-r--r--  1 ziyouzhiyi  admin   1.4K  4 16 22:37 LICENSE
7-rw-r--r--  1 ziyouzhiyi  admin    49B  4 16 22:37 README
8drwxr-xr-x  3 ziyouzhiyi  admin    96B  5 14 10:49 bin
9-rw-r--r--  1 ziyouzhiyi  admin   685B  5 14 10:49 homebrew.mxcl.nginx.plist
10-rw-r--r--  1 ziyouzhiyi  admin   202B  5 14 10:49 homebrew.nginx.service
11lrwxr-xr-x  1 ziyouzhiyi  admin    16B  5 14 10:49 html -> ../../../var/www
12drwxr-xr-x  4 ziyouzhiyi  admin   128B  4 16 22:37 share
13(base) zyzy:1.25.5 (master) $ ls -ld $(readlink html)
14drwxr-xr-x  4 ziyouzhiyi  admin  128  2 15 00:03 ../../../var/www
15(base) zyzy:1.25.5 (master) $ cd html
16(base) zyzy:html (master) $ ls
1750x.html   index.html
可以清晰的看到,html 不仅仅是一个软链接,他还是一个文件夹,Linux 和 MacOS 都可以将文件夹作为软链接,这样可以避免移动文件夹。
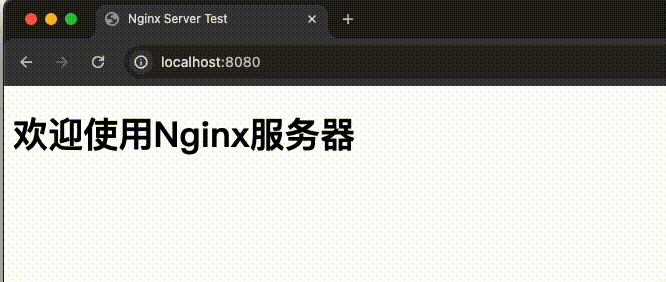
我们改动 index.html,然后 nginx -s reload 重新加载配置,可以看到浏览器的页面已经修改:
1(base) zyzy:1.25.5 (master) $ cd html
2(base) zyzy:html (master) $ ls
350x.html   index.html
- location / 下的 root 指定
include servers/;*:表示将 servers 目录下的所有配置文件包含进来
反向代理及负载均衡
写一个最简单的 node http 服务 index.js
1const http = require("http");
2
3const PORT = 3000;
4const server = http.createServer((req, res) => {
5  res.writeHead(200, { "Content-Type": "text/html" });
6  res.write(***<h1>Node.js web server! Port: ${PORT}</h1>***);
7  res.end();
8});
9
10server.listen(PORT, () => {
11  console.log(***Server is running on port ${PORT}***);
12});
我们将其复制 2 份,端口号分别改为 3020 和 3030,文件名改为 index-3000.js,index-3020.js,index-3030.js,分别跑起来,页面localhost:3000、localhost:3020、localhost:3030 都能打开。
再修改 nginx.conf,添加反向代理配置:http 模块中添加 upstream反向代理字段, server 模块中添加 proxy_pass字段,如下:
1http {
2    # 其他配置。。。
3
4    upstream backend {
5        server 127.0.0.1:3000;
6        server 127.0.0.1:3010;
7        server 127.0.0.1:3020;
8    }
9
10    server {
11        location /app {
12            # backend字段对应上面upstream的backend字段
13            proxy_pass http://backend;
14        }
15    }
16}
重载 nginx -s reload,然后访问 localhost:8080/app,再不断刷新,页面显示如下,反向代理成功:
请求策略
- weight
upstream 字段下的 ip 地址,可以添加权重 weight,如:
1    upstream backend {
2        server 127.0.0.1:3000 weight=3;
3        server 127.0.0.1:3010;
4        server 127.0.0.1:3020;
5    }
这样,我们多数的请求就会分配到端口为 3000 的服务器上,3000 的请求数量就会是其余两个的 3 倍。
- ip_hash
1    upstream backend {
2        ip_hash;
3        server 127.0.0.1:3000;
4        server 127.0.0.1:3010;
5        server 127.0.0.1:3020;
6    }
ip_hash:根据客户端的 IP 地址进行哈希,同一个客户端的请求会分配到同一个服务器上,这样主要是解决 session 命中的问题。
SSL 配置
HTTPS 的安全层正数,可以在主流的云平台申请,我们也可以自己制作证书
生成密钥和证书
1openssl genrsa -out private.key 2048
2openssl req -new -key private.key -out cert.csr
3openssl x509 -req -in cert.csr -out cacert.pem -signkey private.key -days 3650
按照以上命令生成了 cacert.pem(证书) 和 private.key(私钥) 两个文件。将两个文件移动到 /opt/homebrew/etc/nginx/ 目录下
1(base) zyzy:1.25.5 (master) $ mv cacert.pem private.key /opt/homebrew/etc/nginx/
配置 nginx.conf 如下:
1server {
2    # ssl证书默认443端口:
3    listen       443 ssl;
4    server_name  localhost;
5
6    # 以下写法固定:
7    # 证书文件名称:
8    ssl_certificate      /opt/homebrew/etc/nginx/cacert.pem;
9    # 私钥文件名称:
10    ssl_certificate_key /opt/homebrew/etc/nginx/private.key;
11    # ssl验证:
12    ssl_session_timeout  5m; # 缓存有效期
13    # 安全链接可选的加密协议:
14    ssl_protocols  TLSv1 TLSv1.1 TLSv1.2 TLSv1.3;
15    # 加密套件/加密算法,写法遵循 openssl的格式:
16    ssl_ciphers  ECDHE-RSA-AES128-GCM-SHA256:HIGH:!aNULL:!MD5:!RC4:!DHE;
17    # 使用服务端的首选算法:
18    ssl_prefer_server_ciphers  on;
19}
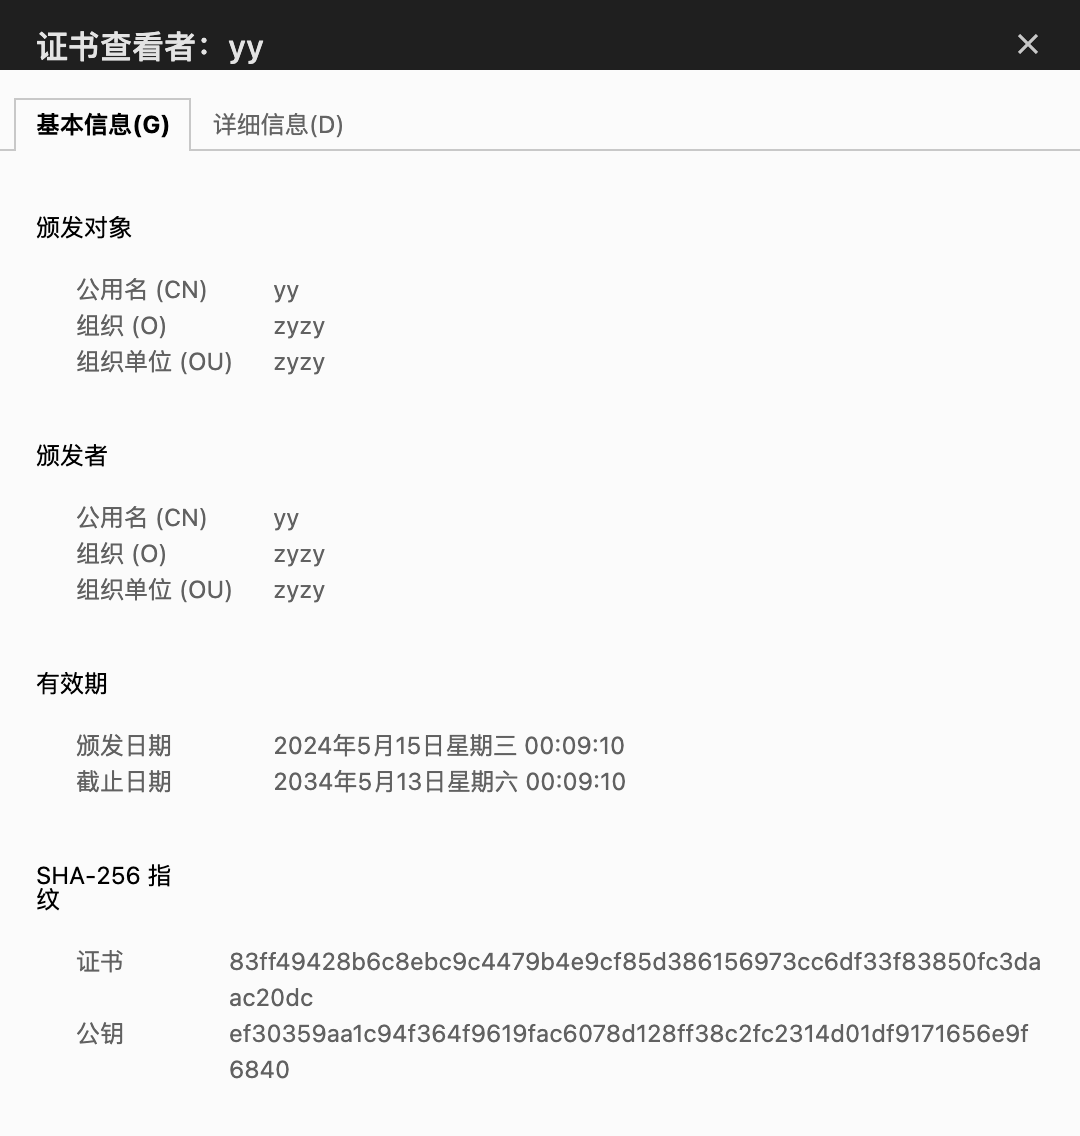
当我们访问 localhost:8080,会发现 chrome 浏览器会提示我们不安全,这是因为证书是我们自己制作的,并非机构颁发,我们选择继续访问,并在这里可以点开查看我们刚刚输入的证书信息:
 点击看到证书:
配置重定向
可以将 http 的访问重定向到我们的 https 端口上
1    server {
2        listen       8080;
3        server_name  localhost;
4        return 301 https://$host$request_uri;
5    }
如果有配置域名,则改为如下:
1    server {
2        listen       8080;
3        server_name  zyzy.info;
4        return 301 https://$server_name$request_uri;
5    }
虚拟主机
在网站初期,访问量较小,一个服务器配置多个服务可以节省资源,这种多服务器配置称为虚拟主机,下面我们来实现
server 独立配置
我们将 /opt/homebrew/etc/nginx/nginx.conf 下上面配置好的 server单独剪切出来,新建一个 localhost.conf 文件,放到 /opt/homebrew/etc/nginx/server 下,
重载 nginx -s reload,浏览器打开发现网站正常运行,说明 server 目录可以存放多个虚拟主机的配置文件。
/nginx/server下创建其他服务
创建前端 SPA 页面
结合的 SPA 项目,我们用 vite 生成一个 react 项目,
1npm create vite@latest demo-project -- --template react
2cd vite_react
3npm install
4npm run build
进入 dist 目录,复制路径:
1(base) zyzy:dist $ pwd
2/Users/ziyouzhiyi/servers/demo-project/dist
创建server 模块
我们在 /opt/homebrew/etc/nginx/server 目录下写一个 vite_react.conf 配置文件,配置如下:将上面***/Users/ziyouzhiyi/servers/demo-project/dist*** 路径配置如下:
1server {
2  listen 5173;
3  server_name vite_react;
4
5  location / {
6    root /Users/ziyouzhiyi/servers/demo-project/dist;
7    index index.html index.htm;
8  }
9}
重载 nginx -s reload
检验配置
访问 localhost:5173,页面正常显示,说明配置成功。页面访问:***http://localhost:5173/***,如下:

上面的页面还没配置 ssl,我们把他改成 https 访问,将 localhost.conf,的配置粘过来,改动如下:
1server {
2  listen 5173 ssl;
3  server_name vite_react;
4
5    # 证书文件名称:
6  ssl_certificate      /opt/homebrew/etc/nginx/cacert.pem;
7  # 私钥文件名称:
8  ssl_certificate_key /opt/homebrew/etc/nginx/private.key;
9  # 以下配置固定:
10  # ssl验证:
11  ssl_session_timeout  5m; # 缓存有效期
12  # 安全链接可选的加密协议:
13  ssl_protocols  TLSv1 TLSv1.1 TLSv1.2 TLSv1.3;
14  # 加密套件/加密算法,写法遵循 openssl的格式:
15  ssl_ciphers  ECDHE-RSA-AES128-GCM-SHA256:HIGH:!aNULL:!MD5:!RC4:!DHE;
16  # 使用服务端的首选算法:
17  ssl_prefer_server_ciphers  on;
18
19  location / {
20    root /Users/ziyouzhiyi/servers/demo-project/dist;
21    index index.html index.htm;
22  }
23}